How To Remove a Stripped Set-screw From a Bathroom Faucet Handle?
Addressing the issue of a stripped set screw in a bathroom faucet handle is crucial for maintaining the functionality and aesthetics of your plumbing fixtures.
Over time, these small screws can become worn, rusted, or damaged, making them difficult to remove with conventional tools. A stripped set screw not only hampers your ability to repair or replace the faucet handle but also poses potential risks if left unattended, such as water leakage or further damage to the handle itself.
Say goodbye to the hassle of calling a professional plumber and shelling out your hard-earned dollars for a seemingly simple fix. With our step-by-step guide on how to remove a stripped set-screw from a bathroom faucet handle, you’ll become a DIY plumbing expert in no time.
Why a Set Screw Is Stripped?

Over-tightening is one of the common causes of a stripped set screw. When installing a bathroom faucet handle, it’s essential to follow the manufacturer’s instructions and apply the appropriate level of tightness.
Applying excessive force or torque can cause the threads to become damaged, leading to stripping. It’s important to strike a balance between securing the handle firmly and avoiding excessive tightening.
Another cause of a stripped set screw is wear and tear. Over time, the repeated turning and twisting of the set screw during regular use can gradually wear down the threads.
This wear weakens the grip between the screw and the handle, eventually resulting in a stripped set screw. To minimize wear and tear, it’s advisable to handle the faucet with care and avoid excessive force when operating the handle.
The quality of the materials used in manufacturing set screws also plays a significant role in their susceptibility to stripping. Set screws made from low-quality or inferior materials are more prone to damage and stripping.
To prevent this issue, it is recommended to choose faucets and fixtures from reputable manufacturers that prioritize the use of durable and corrosion-resistant materials. Investing in high-quality products ensures better longevity and reduces the risk of encountering stripped set screws.
Step-by-Step Guide to Removing a Stripped Set Screw From a Bathroom Faucet Handle

Step 1 – Assessing Set Screw
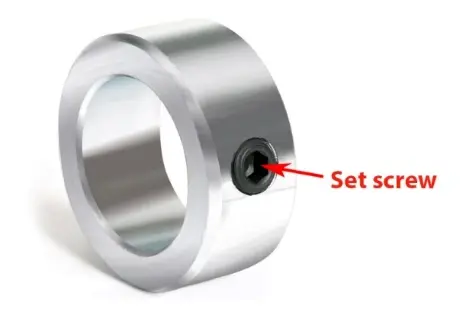
Examine the stripped set screw carefully to determine the level of damage. Look for signs of wear, corrosion, or deformation on the screw head. If the screw head appears worn or damaged, it is likely stripped.
Determine whether the screw is partially stripped or completely stripped. If the screwdriver or Allen wrench cannot engage with the screw properly, it is completely stripped.
Step 2 – Applying Penetrating Oil or Lubricant
Apply a substantial amount of penetrating oil or lubricant to the stripped set screw to start the removal process.
This step is essential because it aids in the breakdown of any rust or debris that might be preventing the screw from turning. For this purpose, penetrating oils like WD-40 or PB Blaster are frequently utilized.
Make sure the oil or lubricant is thoroughly applied to the stripped set screw. As a result, it will be able to enter and embed itself in the set screw’s threads. Be patient because it can take a few minutes for the oil to start working its magic and loosen the screw’s hold.
During this waiting period, it can be helpful to gently tap the screw with a hammer to further encourage the oil to penetrate. The vibrations from the tapping can aid in breaking up any stubborn rust or corrosion.
Step 3: Using The Correct Screwdriver or Allen Wrench
In order to remove a stripped set screw successfully, the right tool must be chosen. Pick an Allen wrench or screwdriver that is appropriate for the set screw’s size and shape. The removal process can become more difficult and cause further harm if the incorrect tool is used.
Once you have the right tool, hold onto it firmly to prevent slippage and possibly rounding off the screw head. You’ll have more control and more chances of extracting the set screw if you have a firm grasp.
With the tool in place, apply gentle pressure while turning counterclockwise to attempt to remove the set screw.
If the screw starts to turn, continue unscrewing it until it is fully removed. Take care to maintain a steady grip and avoid applying excessive force, as this can cause the tool to slip or damage the faucet handle.
Step 4: Applying Heat To Loosen The Set Screw (if necessary)
If the set screw remains stuck despite your efforts, applying heat can be an effective method to expand the metal and loosen the grip. This step is particularly useful when dealing with stubborn or heavily corroded set screws.
Using a heat source such as a hairdryer or a heat gun on a low heat setting, direct the heat towards the area where the set screw is located.
Hold the heat source a few inches away from the stripped set screw to evenly distribute the heat. Allow the heat to warm the metal for about a minute.
The heat will cause the metal to expand slightly, potentially breaking the bond between the set screw and the surrounding material. Be cautious not to overheat the surrounding parts or the faucet handle itself, as excessive heat can cause damage.
Step 5: Using Alternative Removal Methods
If the previous steps have not been successful in removing the stripped set screw, there are alternative methods to consider before seeking professional assistance.
One such method is the rubber band technique. To employ the rubber band technique, wrap a rubber band tightly around the stripped set screw.
This will provide extra grip and traction when attempting to turn the screw. The rubber band can help fill in the gaps and provide enough friction to loosen the set screw.
Insert the screwdriver or Allen wrench into the set screw while applying downward pressure and turning counterclockwise.
The added grip from the rubber band can enhance your leverage and increase your chances of successfully removing the set screw.
If the rubber band technique does not yield the desired results, it may be time to seek professional assistance. A licensed plumber or a professional handyman with experience in faucet repairs will have specialized tools and techniques to tackle stubborn set screws without causing further damage to the faucet handle.
What Happens If You Don’t Change Stripped Set Screw?
- Further Damage to the Handle: A loose or wobbly handle caused by a stripped set screw can result in additional wear and tear on the faucet handle mechanism. Over time, this can lead to more severe damage, requiring costly repairs or even replacement of the entire faucet.
- Difficulty in Operating the Faucet: As the set screw becomes increasingly stripped, the handle’s functionality may be compromised. This can make it difficult to control the water flow or temperature, causing inconvenience and frustration during everyday use.
- Water Leakage: A loose handle due to a stripped set screw can create gaps between the handle and the valve stem, potentially causing water to leak from the faucet. Continuous leakage not only wastes water but can also lead to water damage to surrounding fixtures and cabinets.
- Safety Hazards: If the handle becomes completely detached from the valve stem due to a stripped set screw, it poses a safety hazard. The sudden loss of control over water flow can lead to unexpected water surges, scalding, or other accidents.
Can You Drill Out a Set Screw?
- Gather the necessary tools: You will need a power drill, a drill bit slightly smaller than the diameter of the set screw, safety goggles, and a center punch.
- Prepare the work area: Ensure the faucet handle is securely held in place to prevent any movement while drilling. Cover the surrounding area with a cloth or plastic sheet to catch any metal shavings or debris.
- Mark the center of the set screw: Use a center punch to create a small indentation at the center of the set screw. This will help guide the drill bit and prevent it from wandering.
- Start drilling: Attach the appropriate-sized drill bit to your power drill. Begin drilling slowly and steadily at the center indentation, applying gentle pressure. Use a low-speed setting to prevent overheating and damage.
- Increase drill bit size if necessary: If the initial drill bit fails to remove the set screw, you may need to gradually increase the drill bit size. Choose a slightly larger drill bit and repeat the drilling process. It’s important not to rush or apply excessive force, as it can lead to the drill bit getting stuck or the surrounding material being damaged.
- Remove the set screw: Once the drilled hole is deep enough, the weakened set screw should be easy to extract. You can use pliers or a screw extractor tool to grip and turn the remains of the set screw counterclockwise until it is completely removed.
- Clean the area: After removing the set screw, clean any debris or metal shavings from the drilled hole and surrounding area. Use a cloth or compressed air to ensure everything is clear.
- Repair or replace the faucet handle: Assess the condition of the faucet handle. If it has been damaged during the removal process, consider repairing or replacing it as necessary.

Meet Ralph Matthews, father of 2 cute daughters and a skilled plumber with over 10 years of experience in the industry. Ralph has particular expertise in repairing any type of faucet and has helped countless homeowners and businesses solve their plumbing problems with his expert knowledge and attention to detail.


