How To Repair A Leaking Moen Kitchen Faucet?
Disclosure: Faucetshowerguide.com is reader-supported. We may receive commissions from purchases made via our links at no additional costs to you.
Moen is a well-known brand of kitchen and bathroom faucets. Its faucets are well-known for their durability, long life, and high performance. Nonetheless, its faucets must be cleaned regularly in order for them to function properly.
A leaking Moen faucet is not only a significant annoyance but also wastes lots of water and increases the monthly water bill. Therefore it is essential to learn how to repair a leaking Moen kitchen faucet. Good thing is that repairing the leakage of the Moen kitchen faucet is not as difficult as it may seem.
In this step-by-step tutorial, you will learn, from identifying the problem to replacing the essential parts of the Moen Kitchen fixture. So, roll up your sleeves, grab essential tools, and replace damaged parts to fix the leak.

Best Seller
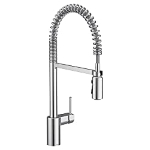
Moen Align Chrome One-Handle Pre-Rinse Spring Pulldown Kitchen Faucet
Chrome finish is highly reflective, Offers 3 times more reach, Pulldown hose offers flexible water delivery, Hose retracts with ease
Why Is Moen Kitchen Faucet Leaking?
A kitchen faucet is an important part of your plumbing system. Leaks in the Moen kitchen faucet are minor annoying, but if you don’t repair it, they can cause serious water damage. A leaky kitchen faucet creates uneven pressure in the sink. This uneven pressure creates more leaks around the pipes.
- A cartridge is a component of a faucet that regulates the flow of water. The cartridge might get worn or broken over time, resulting in leakage. Remove the cartridge and look for wear or damage. It must be replaced if it is damaged.
- With time, the nuts and bolts that hold the faucet together might loosen, causing the faucet to leak. The handle is a frequent location where leaks might happen. Look for any damage or cracks that might be the source of the leak. It could be necessary to tighten or replace the handle if that’s the problem.
- The valve seat is the faucet component that links the spout to the faucet body. Leaks might occur if the valve seat becomes rusted. It may leak if it is worn or broken. Examine the valve seat with a flashlight to check for any wear or damage. It must be replaced if it is damaged.
- O-rings are rubber seals that keep water from leaking from the faucet. Water might flow out if the O-rings become broken. Leaks may occur if they grow worn or dry out. Examine them for wear or damage, and replace them if required.
- When the water pressure in your home is too high, the faucet may leak. The excessive water pressure might cause the faucet’s cartridge or other parts to wear out more quickly than they should.
How To Repair a Leaking Moen Kitchen Faucet?
Remove Moen Faucet Parts
Remove Handle
The handle is similar to the face of your faucet, and it’s normally held in place by a set screw or Phillips screw hidden beneath the decorative cap of the handle. Because of the decorative cap, the screw may be difficult to locate. Once you’ve found it, remove it with a screwdriver that fits the screw’s size.
Gently removing the Moen faucet handle. To avoid harming the faucet, remember to be gentle. The handle should simply come off with a little delicacy.
Remove The Cartridge
Find the retention clip that secures the cartridge. Usually found near the top of the cartridge, it is a little metal clip. Use a pair of pliers to carefully remove the clip once you’ve located it. You’ll need to reconnect the clip, so take care not to damage it.
The cartridge itself has to be taken out now. Pull the cartridge out of the faucet gently. To get it to loosen, you might need to move it back and forth a little bit. Avoid applying too much pressure as this might harm the faucet.
Take a minute to check the cartridge once you’ve removed it. Examine the surface for evidence of wear or deterioration, such as cracks or rust. If you detect any problems, it’s best to change the cartridge totally. This will ensure that your faucet continues to function normally and does not leak again anytime soon.
Remove The O-Ring and Seal
Your Moen kitchen faucet’s cartridge has just been properly removed but you discover two little parts at the base of the cartridge. The O-ring and seal are these little parts, but don’t be misled by their diminutive size! These are essential in avoiding water leaks from the faucet. Without them, your kitchen may quickly become a little water park!
How can you get rid of these now? A pair of pliers and a light hand are all that is required. Voila! Carefully remove them from the cartridge. You have effectively taken off the O-ring and seal.
Tips To Follow While Removing Faucet Parts
- Make sure you disassemble the Moen faucet using the proper tools to avoid damaging it. Employ pliers that fit the components’ size and a screwdriver that fits the screws.
- To avoid damaging the faucet, be careful when removing the handle, escutcheon plate, cartridge, O-ring, and seal. Use penetrating oil to loosen a difficult-to-remove component.
- Make a note of the components’ locations and the sequence in which you remove them to make it simpler to reassemble the faucet. To make it easier for you to recall where the components are, you can snap photographs or draw a schematic.
Replace Faulty Part
You’ll need to figure out which part is producing the leak. Once you’ve identified the cause, it’s time to take the right tool and get to work.
For example, if the cartridge is an issue, you may need to use a pair of pliers to carefully remove it. If an O-ring is the cause, a little screwdriver will come in useful to pull it out. It’s critical to use the proper equipment for the procedure to prevent harming the faucet and exacerbating the problem.
Wipe away any dirt or mineral deposits that have developed around the defective part using a clean cloth or sponge. This step is critical to ensuring that the new component operates efficiently and does not become blocked by remaining muck.
Now that you’ve got a new part in your hands, it’s time to put it together! Take a minute to appreciate its immaculate condition.
Place the replacement component carefully in the location of the old, defective part. Ascertain that it fits tightly and is properly oriented. You don’t want to force anything or risk ruining your new component.
To avoid mistakes, always follow the manufacturer’s instructions while installing a new component. Various parts may require different installation processes, so be sure you’re doing everything correctly.
Once the replacement component has been installed, reassemble the faucet. This may entail reinstalling the handle, tightening any previously loosened screws or nuts, and reattaching the aerator. Take your time to ensure that everything is tightened and fastened properly.
How to Fix a Leaky Moen Double Handle Kitchen Faucet?
- Turn off the faucet’s water supply first.
- Use a Philips screwdriver to take off the handle.
- Remove the cap from the valve stem with a flathead screwdriver.
- The valve stem’s holding clip would be present. To remove the holding clip, a plier will be useful.
- You may now remove the valve stem from the faucet body because it is now unattached.
- Take a check on the washer’s condition. You must replace it if it is harmed or worn out.
- Install a new washer onto the valve stem after removing the old one.
- Reattach all components, being sure to correctly tighten each one.
Frequently Asked Questions
How Do I Stop My Moen Kitchen Faucet From Dripping?
After changing o ring in the Moen faucet if it is still dripping then you need to change the cartridge in the faucet. Over time cartridges inside the Moen faucet wear out and become the reason for the leakage and dripping.
Why Does My Moen Kitchen Faucet Leak at The Base?
The o ring is the main cause of your Moen kitchen faucet leaking at the base. change o ring and the faucet will work without leakage.
Related Post – Moen Touchless Faucet TroubleShooting Steps

Meet Ralph Matthews, father of 2 cute daughters and a skilled plumber with over 10 years of experience in the industry. Ralph has particular expertise in repairing any type of faucet and has helped countless homeowners and businesses solve their plumbing problems with his expert knowledge and attention to detail.
Recommended By Faucetsshowerguide's Team
Santa's Certified Letter - Personalized Letter - Christmas Gift
Weight Loss for Men - Oral Sermorelin Peptide


Can I use peerless plumbing kit on a moen faucet and if not where do I get the moen plumbing kit
Here is the plumbing kit for Moen faucet https://amzn.to/3xM8AGk