Low Water Pressure After Replacing Cartridge
Disclosure: Faucetshowerguide.com is reader-supported. We may receive commissions from purchases made via our links at no additional costs to you.
In the kitchen and bathroom, most work are performed around the faucet so it should be fully functional with good water pressure. Without enough water pressure, it becomes difficult to complete washing tasks within time.
To increase water pressure or fix the leakage, people change the ffaucet cartridge of the faucet. A clogged cartridge slows down the water pressure. If the cartridge is worn out, it becomes the reason for leakage in the faucet.
A few of our readers asked us about low water pressure after replacing cartridge issue. They changed cartridges but their water pressure didn’t increase. So, we did some research and find out the reasons and solutions.

On Sale
WEWE Single Handle Kitchen Faucet
Tulip kitchen faucet design, 3 way spray, Pull down hose, and water Line hose altogether preinstalled, DIY installation less than 30 minutes
Why My Faucet Has Low Water Pressure After Replacing Cartridge?
1. Water Pressure Issue
Start with checking other faucets in the house. Turn other faucets and check whether the only repaired faucet is facing a low water pressure issue or other faucets are also having the same issue.
You should also talk with your neighbors and ask them if they are getting perfect water pressure or not.
If other faucets are facing the same issue then the cartridge is not at the fault.
Also, you can do a test to check the water pressure. Take a 5-gallon bucket and put it under the faucet. Now start the timer and fill the bucket. If a 5-gallon bucket takes 1 minute to fill fully it means you are getting a 10 GPM water flow rate which is good. While doing this close all other faucets in the house.
2. Clogged Aerator

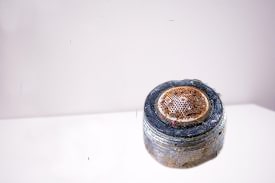
If you don’t know what is aerator, the aerator works as a flow restrictor and it is compulsory to use it inside the faucet to control the wastage of water.
Aerator holes are tiny so water flow becomes smooth and gentle. Over time, mineral build-up forms inside these holes and blocks the way of water and no water comes out from the faucet. When people face a low water pressure issue, they change cartridges.
But they don’t know that the cartridge is not the main culprit. After replacing the tap cartridge, still, you are getting low water pressure in the faucet, check the aerator. It has a high chance that aerator holes are blocked so you are getting low pressure.
3. Cartridge Is Not Fixed Properly

The cartridge is not a lifelong thing, over time it gets damaged and you will have to change it.
Prime 6-month trial at $0 For Young Adult (For Our Readers) - Get Prime
Not all people know how to change cartridges. But it is not a hard task, so by watching DIY videos, you can replace cartridges.
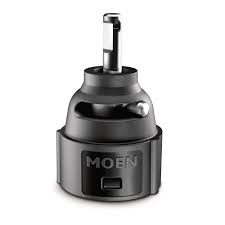
The cartridge is found inside the handle. When you move the handle, it makes space for water so water comes out from the spout. Due to mineral build-up and handle friction, the cartridge is worn out and becomes useless. So, you get low water pressure.
If you are going to replace the cartridge make sure, you fit it properly. Loosen faucet cartridge won’t work.
Now you all reasons for low water pressure after replacing the cartridge so let’s see what are solutions.
How To Fix Low Water Pressure After Replacing Cartridge?
1. Check the Water Pressure
If other faucets in the house are having low water pressure then cartridge replacement is not an issue. You should check the water pressure in your neighboring house.
If all neighbors are having a low water pressure issue then the problem is with the municipal water supply. Contact your municipal department and tell the problem of low water pressure issues in your area.
If only that faucet is having low water pressure then check the next solutions.
2. Clean Aerator
Now try the second solution to fix the low water pressure after changing the cartridge. To clean the aerator, you will have to take it out. Use the plier to remove the aerator. The good thing is it is not hard to remove the aerator.
After removing the aerator, you will need to clean its holes that are blocked by debris. If debris is stuck inside holes for a long time period, it smells like sulfur.
First, clean its holes with the needle. One by one insert the needle into every hole and remove debris. By this, you can remove almost most debris from holes. But there may be some debris left.
To clean the aerator properly, use white vinegar. Take white vinegar into a small bowl. The aerator should be completely immersed in vinegar. Leave it for a few hours. At last, clean the aerator with water and reattach it.
3. Fit Cartridge Properly
If cleaning the aerator doesn’t work then the cartridge is the main issue. It is not fitted properly. Modern kitchen faucet cartridge easily gets clogged due to their high precision and small orifices and passages.
Remove the cartridge and check if there are some rubber pieces or debris that may be stuck. Turn on the shut-off water valve so all debris comes out.
Now reattach the cartridge and fit it properly. Before attaching the handle, check there is no gap around the cartridge.
Tip –
Before buying a cartridge, check the faucet model number, so you can order the right cartridge for the faucet.
What Is the Use of Cartridge in the Faucet?

The cartridge in the faucet is used to control the flow of the water. Before cartridge compression valve was used to control water flow. The compression valve worked with a double handle.
For hot and cold water, the faucet was a separate handle. To control the water flow, its valve used screw threads. This screw tightens screw so the water flow stops. But the compression valve was not reliable. They became harder to turn after a few months if you didn’t care them properly.
Then after research faucet manufacturers came up with a cartridge that was better than a compression valve. The cartridge needs only a single handle to control hot and cold water flow. When you turn the handle, the cartridge strategically allows water to flow according to the direction of the handle.
Prime 6-month trial at $0 For Young Adult (For Our Readers) - Get Prime
How To Change Cartridge In the Faucet?
- First, cover the sink drain, so any faucet part doesn’t fall inside the drain.
- Now turn off the water supply to the faucet.
- Remove the faucet handle. For this, use a screwdriver and remove all nuts of the handle.
- If screws are not visible, remove the cap of the handle so you can remove the handle without screws. After removing the cap, you can see hidden screws.
- After removing the handle, it’s time to remove the cartridge.
- To remove the cartridge, use a wrench. Make a grip of the wrench on the cartridge and take it out.
- Now install a new cartridge and attach the handle.
Final Words
People spend their time replacing the cartridge but Still, sometimes the faucet doesn’t work properly. We always try to solve our reader’s problems. So, this article is especially for those who are facing lower water pressure after replacing cartridges. You can try solutions one by one to solve this issue.

Meet Ralph Matthews, father of 2 cute daughters and a skilled plumber with over 10 years of experience in the industry. Ralph has particular expertise in repairing any type of faucet and has helped countless homeowners and businesses solve their plumbing problems with his expert knowledge and attention to detail.
Prime 6-month trial at $0 For Young Adult (For Our Readers) - Get Prime


